AppService Hands-On Lab
In this lab you will create an Azure App Service application. The To do list app allows you to create and manage ‘to do’ items. When you mark to do item as complete, the app will send SMS confirmation to the phone number associated with the to do item.
The To do list app includes a mobile app backend, a Web App, an API App, and a Logic App. The To do list app stores app data in the mobile app backend. The mobile app backend uses the supported .NET languages for server-side business logic. The mobile client app use any client platform supported by Azure App Service Mobile App, including iOS, Windows, Xamarin iOS, and Xamarin Android.
The web app uses the mobile app backend that serves as REST API endpoint. The API app exposes specific functionality required by the Logic app. The Logic app uses the API app to monitor any completed to do items, then it uses a Twilio connector to send the SMS confirmation and mark the to do item as processed to avoid sending multiple SMS for a single item.
At the end of this tutorial, you will have a web client and a mobile client that work with the same data and are kept synced.
If you want to get started with Azure App Service before signing up for an Azure account, go to Try App Service, where you can immediately create a short-lived starter web app in App Service. No credit cards required; no commitments.
Table of Contents
- Create a new mobile app backend
- Create a new universal Windows app
- Connect an AngularJS Web Client to the Mobile App
- Create an API App with ASP.NET Web API
- Create a Logic App
Prerequisites
- Microsoft Azure Subscription
- Visual Studio Community Edition
- Visual Studio 2013 Update 4
- Azure SDK for Visual Studio 2013
Create a new mobile app backend
Follow these steps to create a new mobile app.
-
Log into the Azure Portal. In the bottom left of the window, click +NEW. Scroll until you see the Mobile App item.
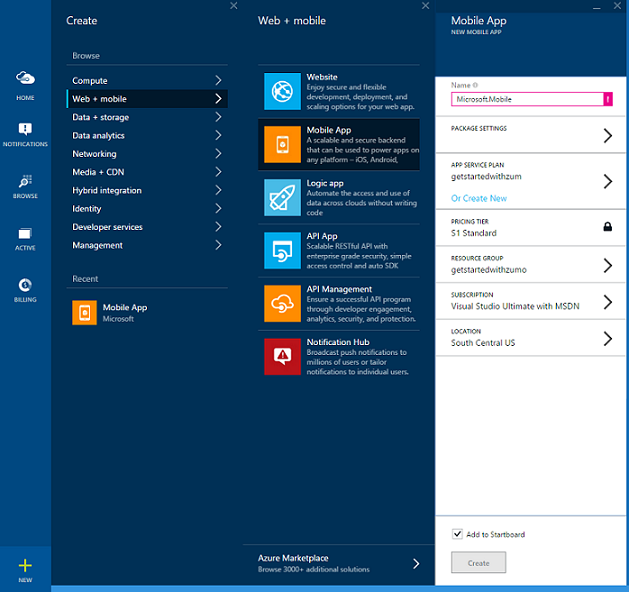
This displays the New Mobile App blade.
-
Type a name for your Mobile App. It must be at least 8 characters long and lowercase a to z.
-
Select a region.
As part of this tutorial, you create a new SQL Database instance and server. You can reuse this new database and administer it as you would any other SQL Database instance. If you already have a database in the same region as the new mobile app backend, you can instead choose Use existing Database and then select that database. The use of a database in a different region is not recommended because of additional bandwidth costs and higher latencies.
-
Select your subscription.
-
Create a new resource group with the same name as your mobile app.
-
In Package Settings, select USERDATABASE, you can choose an existing database or create a new one. For creating a new database, type the name of the new database, create a new server, type the name of that server, then choose a login name, which is the administrator login name for the new SQL Database server, type and confirm the password, and click the ok button to complete the process. If selecting an existing database, you will need to provide a Server Administrator Password.
-
Create a new App Service Plan with the same name as your mobile app.
Type your App Service Plan name, do not copy/paste. There is name validation on this field that fails if you don’t type the name. It doesn’t have to be exactly the same name as the website (but it needs to follow the same rules).
-
Select a Pricing Tier.
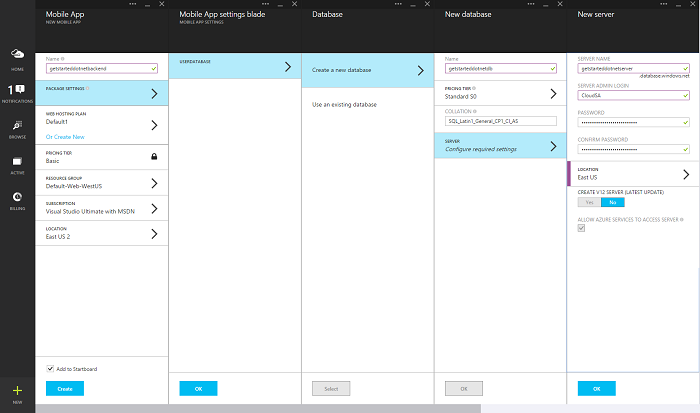
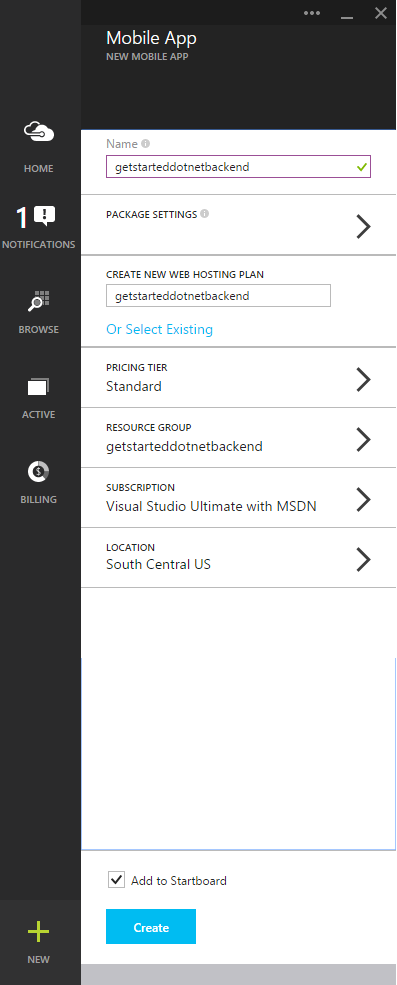
Your new mobile app settings page will now look something like this:
-
Click the Create button at the bottom of the blade and you should see it starting deployment in the notifications window.
You have now created a new mobile app backend that can be used by your mobile apps.
After your mobile app is created, navigate in the portal to the sql server you just created (be sure to select the server and not the azure sql db). From there, click the settings part, expand the firewall part, and change the “Allow access to Azure services”. If you don’t do this, your application won’t work.
Mobile backend verification steps
In the portal, you should now see the newly created Mobile App. You can either browse for all your Mobile Apps, by selecting clicking the BROWSE button on the portal left nav-bar. Or if you have made no changes to the defaults during creation, you should see your new Mobile App on your start board.
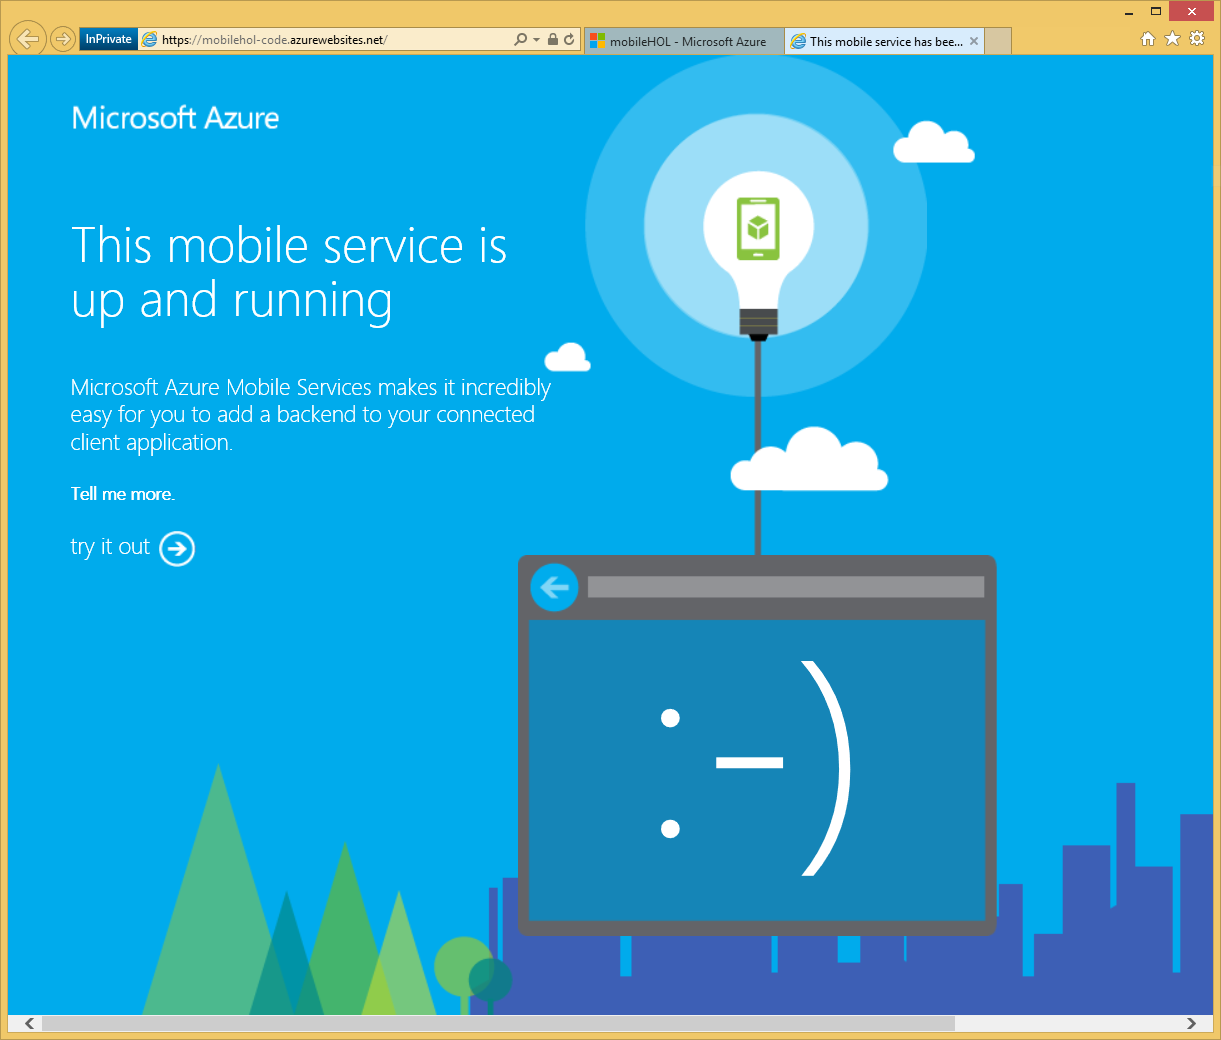
- select the mobile backend app you created. The blad that opens displays your Mobile App URL.
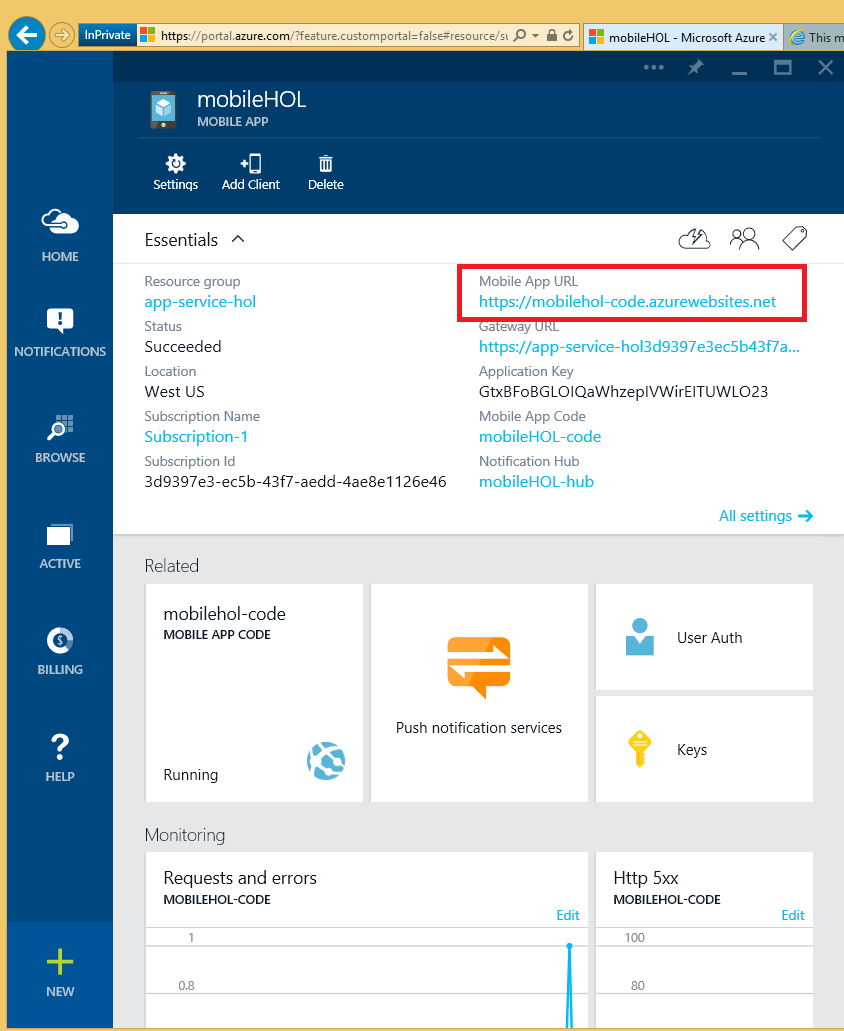
- Click on the Mobile App URL to open an new tab in your browser displaying the mobile app you just created. The page you are seeing is the default created view web apps. You can change it later if you wish to.
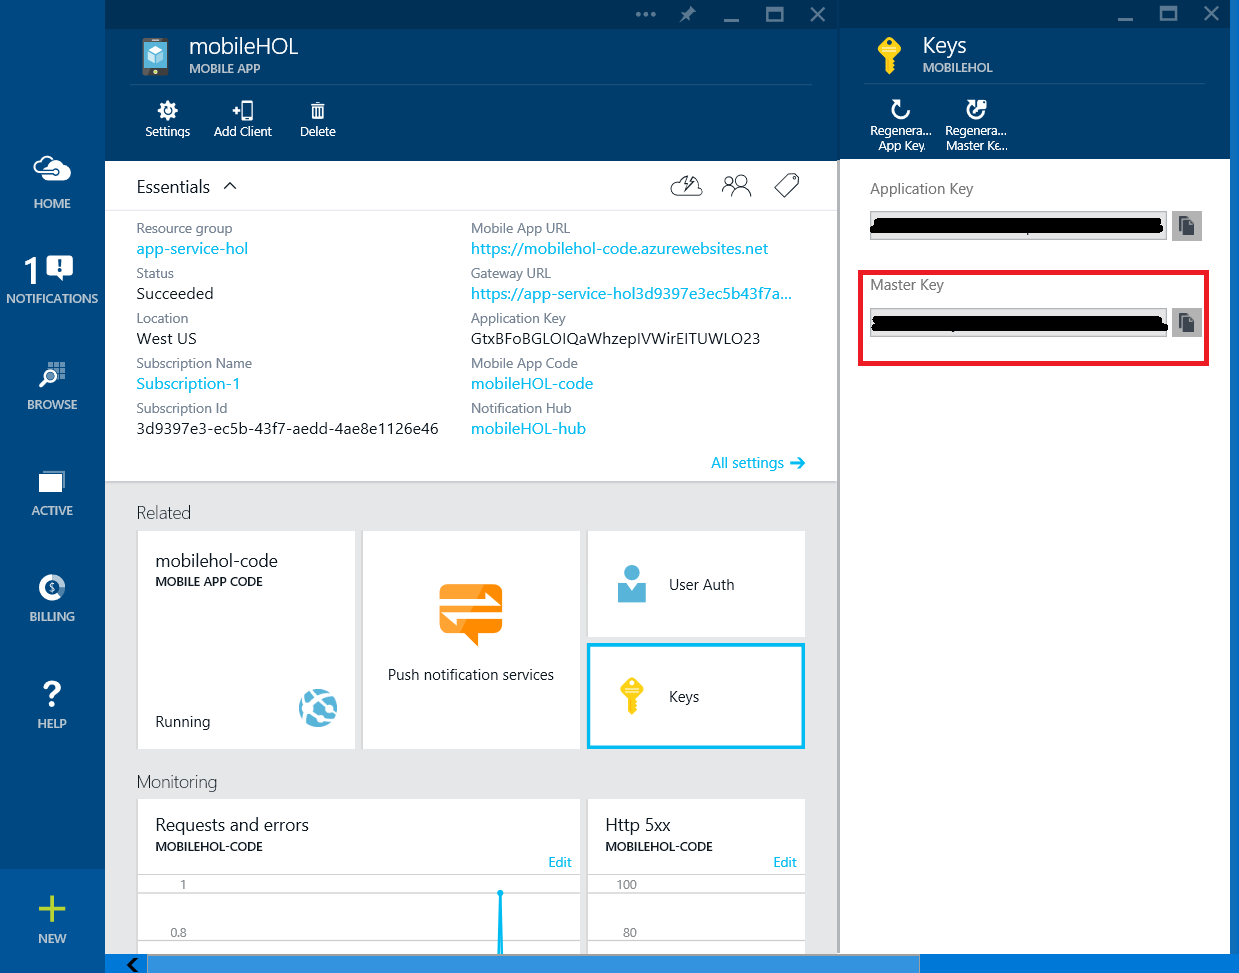
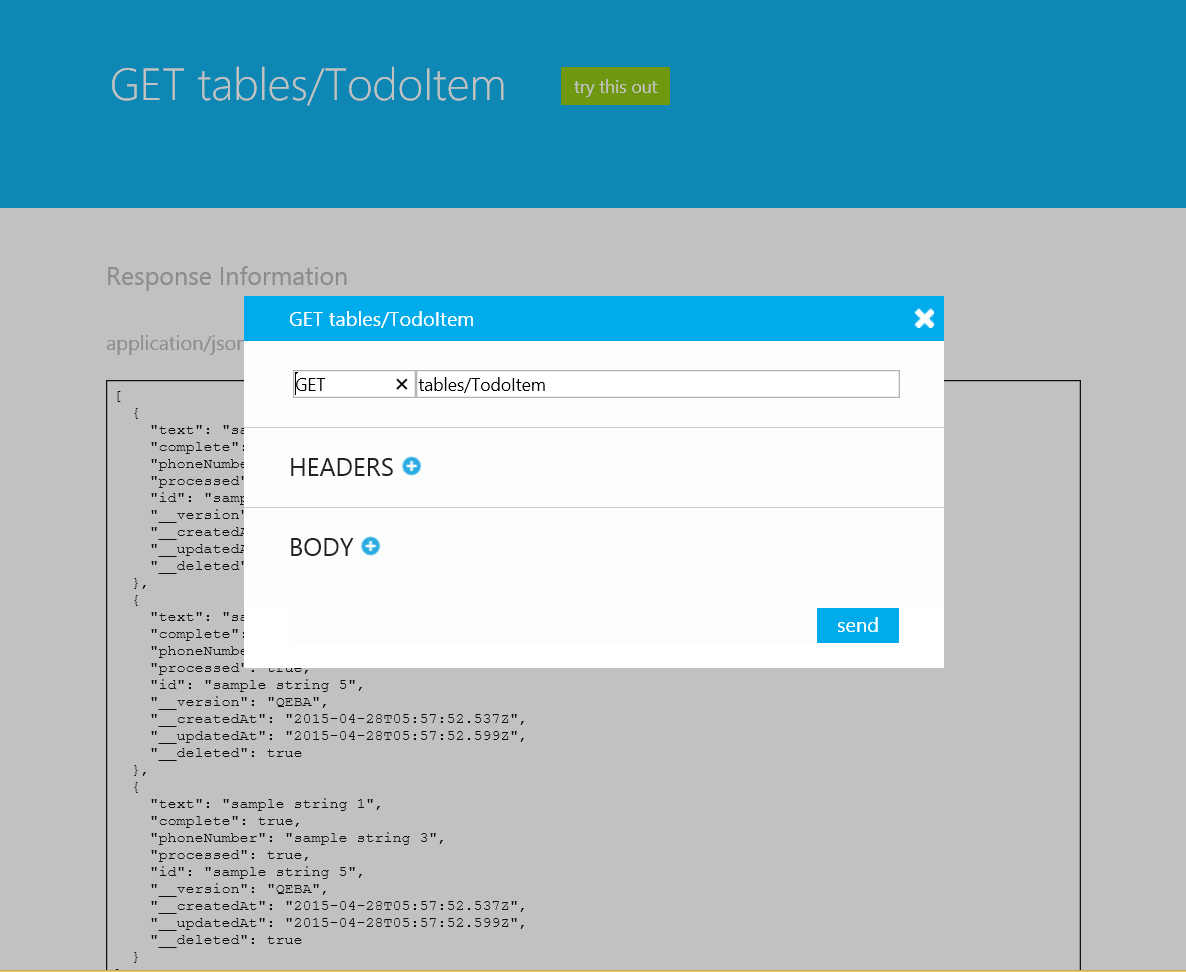
- Click on the try it out arrow on the bottom left part of the mobile backend. This will prompt you for username and password. You will need to copy the Master Key from the Keys part on the mobile app blade in the portal. Leave the username empty and just use the Master Key.
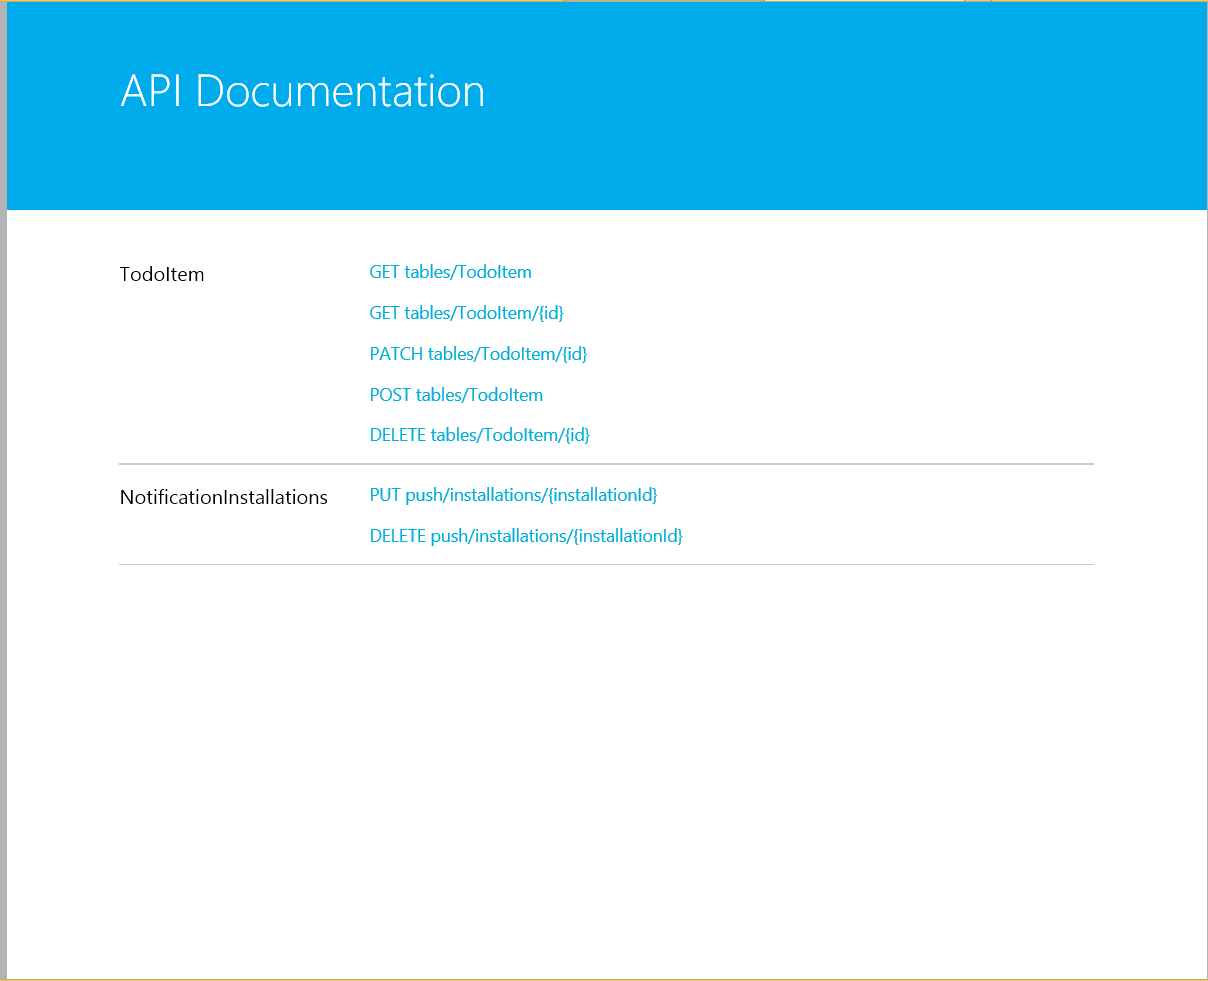
- When you see the following screen, you know your mobile backend application is running. To check the API, click on GET tables/todoItem
- The REST API created by the mobile app return empty default values. Click the green try this out button on the top of the screen to actually try the API directly against your database.
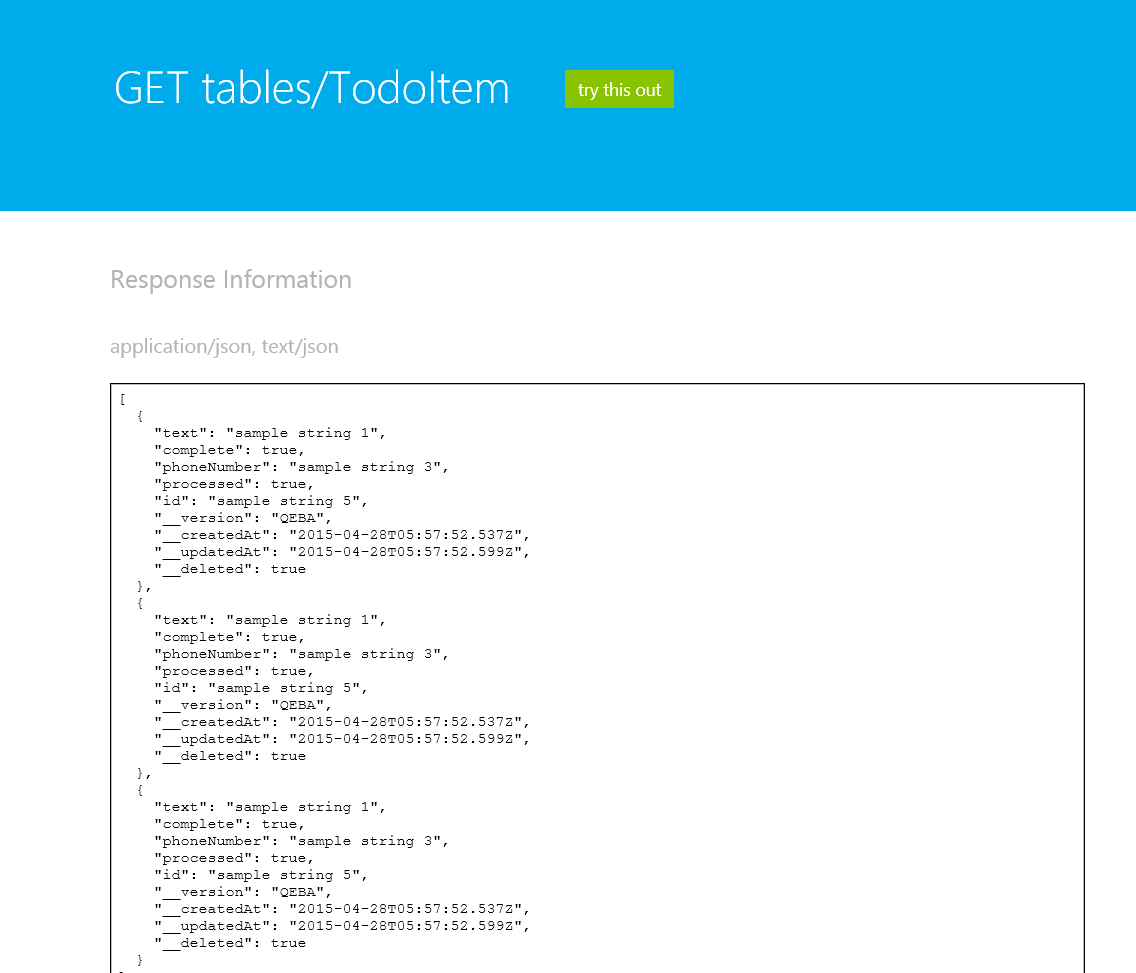
- A popup windows will open, allowing you to send REST API request to your mobile backend. Without making any changes, click the send button.
- You should see a response for the GET request you made to tables/TodoItem
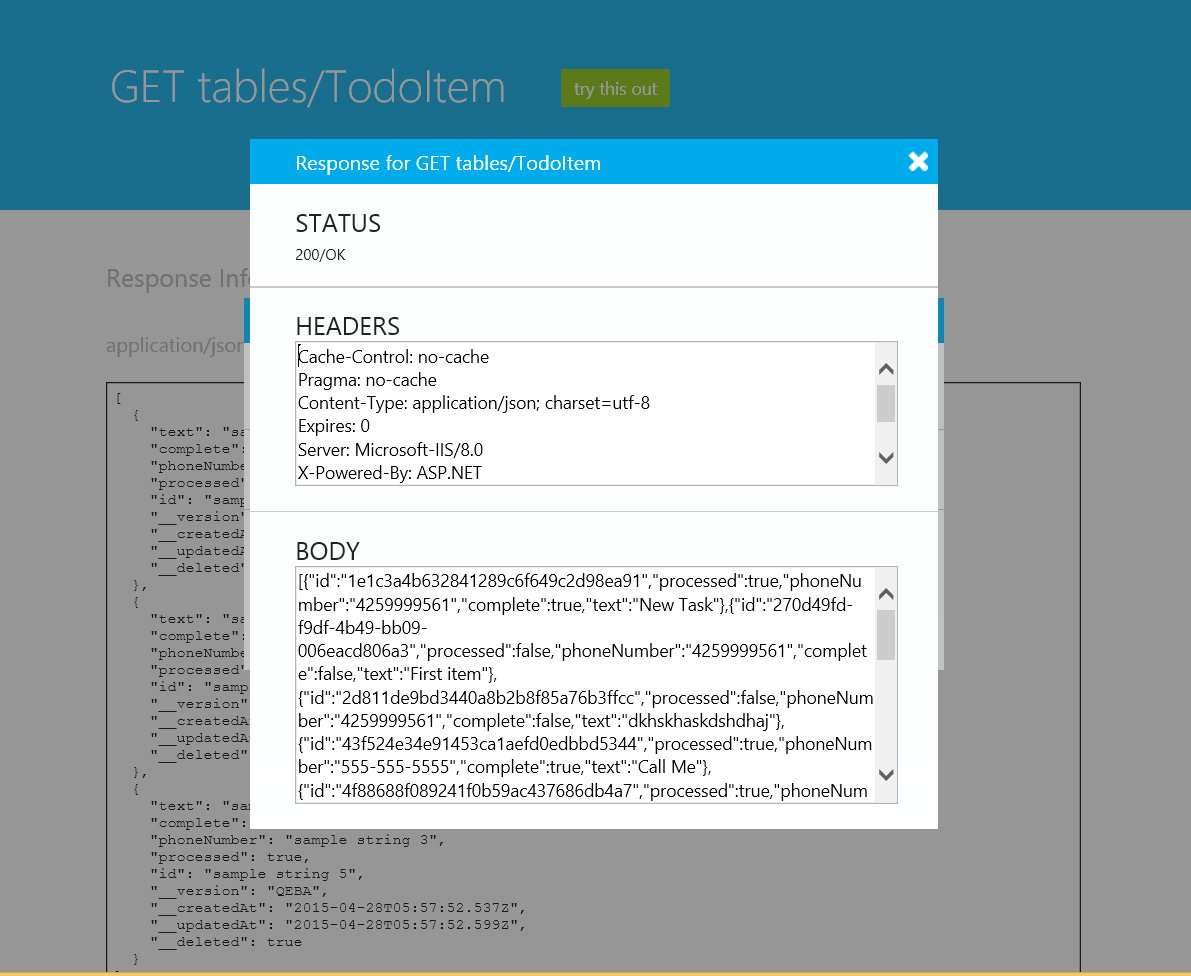
At this stage your mobile backend application is working and successfully connecting to the database.
Create a new universal Windows app
Once you have created your mobile app backend, you can follow an easy quickstart in the Azure Portal to either create a new app or modify an existing app to connect to your mobile app backend.
In this section you will create a new universal Windows app that is connected to your mobile app backend.
-
In the Azure Portal, click Mobile App, and then click the mobile app that you just created.
-
At the top of the blade, click Add Client and expand Windows (C#).
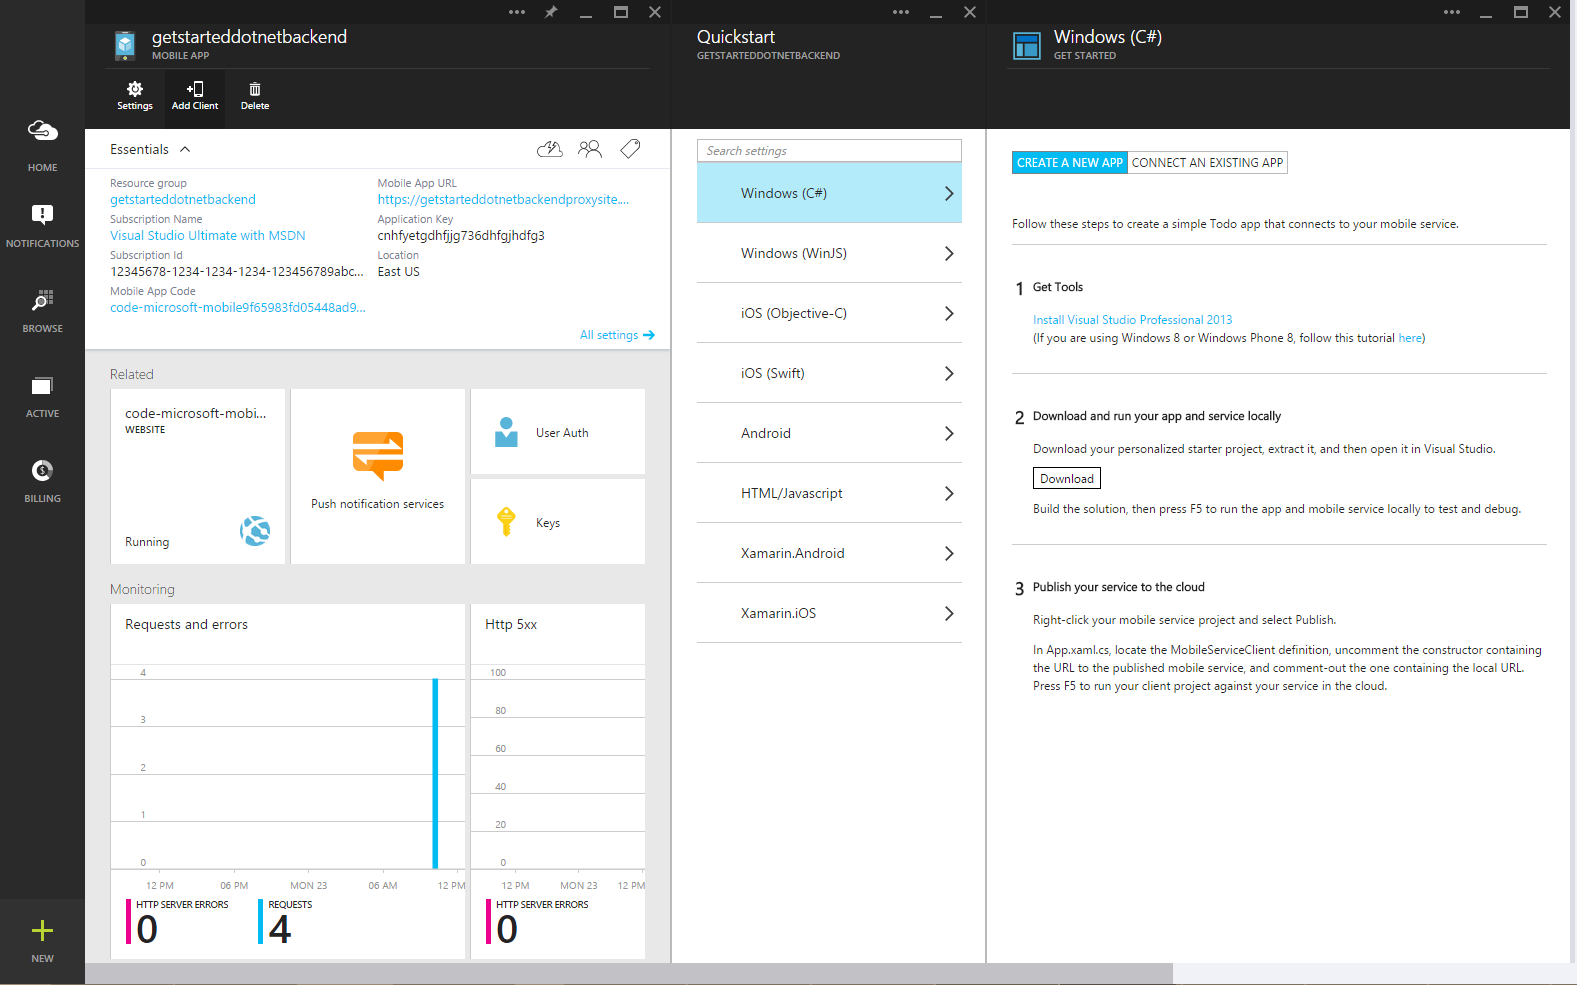
This displays the three easy steps to create a Windows Store app connected to your mobile app backend.
-
If you haven’t already done so, download and install Visual Studio Professional 2013 on your local computer or virtual machine.
-
Under Download and run your app and service locally, select a language for your Windows Store app, then click Download.
This downloads a solution contains projects for both the mobile app backend and for the sample To do list application that is connected to your mobile app backend. Save the compressed project file to your local computer, upzip the compressed file and open Visual studio to edit the project.
-
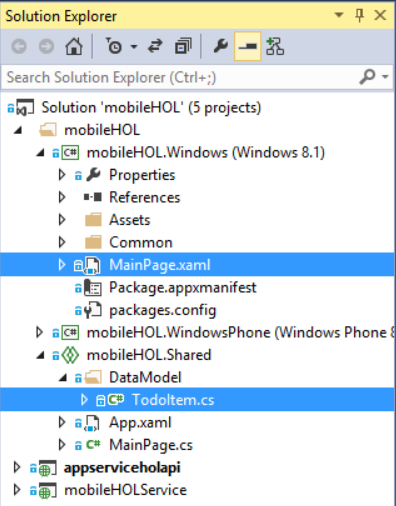
The mobile client application for Windows includes three projects. One projected shared by the two other Windows Phone and Windows 8.1 projects. the shared project includes, among other, the DataModel folder. Identify the TodoItem.cs file and add two properties as indicated by the following code snippet:
public class TodoItem { public string Id { get; set; } [JsonProperty(PropertyName = "text")] public string Text { get; set; } [JsonProperty(PropertyName = "complete")] public bool Complete { get; set; } [JsonProperty(PropertyName ="phonenumber")] public string PhoneNumber { get; set; } } -
Next you need to edit MainPage.xaml in the Windows 8.1 project. You need to add a new textbox for the phone number and a corresponding label. Locate the TextInput TextBox and then make the edits to match the following code snippet
 <StackPanel Orientation="Vertical" Margin="72,0,0,0">
 	<TextBlock>free text goes here</TextBlock>
 	<TextBox Name="TextInput" Margin="5" MinWidth="300"></TextBox>
 	<TextBlock>phone number goes here</TextBlock>
 	<TextBox Name="PhoneInput" Margin="5" MinWidth="300"></TextBox>
 	<Button Name="ButtonSave" Click="ButtonSave_Click" IsEnabled="False">Save</Button>
 </StackPanel>
-
At this stage your Windows 8.1 application should be ready to run and successfully connect to your mobile backend
Connect an AngularJS Web Client to the Mobile App
Enable Anonymous Authentication in Mobile App
- Open ToDoItemController.cs
-
Add the following using statement after line 9
using Microsoft.Azure.Mobile.Security; -
Paste the following Attribute above the class declaration
[AuthorizeLevel(AuthorizationLevel.Anonymous)]
Enable CORS in Mobile App
- Open WebApiConfig.cs in App_Start
-
Add the following using statement after line 8
using System.Web.Http.Cors; -
Add the following code after line 23.
 // Enable CORS
 config.EnableCors(new EnableCorsAttribute("*", "*", "*"));
Create Angular Web Client
- In Visual Studio, right-click on the Solution, Click Add > New Project…
- Select ASP.NET Web Application
- Name the Project
webHOL - In the New ASP.NET Project Dialogue select the Empty template
- Create a new folder to the project called App
-
Create a new file in the App folder called index.html
<!DOCTYPE html> <html lang="en"> <head> <title>MultiChannel ToDo</title> <meta name="viewport" content="width=device-width, initial-scale=1"> <link href="lib/bootstrap/css/bootstrap.min.css" rel="stylesheet" /> <link href="lib/bootstrap/css/bootstrap-theme.min.css" rel="stylesheet" /> <link href="css/site.css" rel="stylesheet" /> </head> <body ng-app="multiChannelToDo"> <div class="container" ng-controller="ToDoController"> <h1><span class="glyphicon glyphicon-list-alt"></span> To Do List</h1> <div class="check-list-container"> <div class="check-list-item-container"> <ul class="check-list"> <li id="check-list-item-" ng-repeat="item in items" ng-hide="" ng-click="complete(item)" class="check-list-item"><span class="glyphicon glyphicon-check" aria-hidden="true"></span> - </li> </ul> </div> </div> <hr class=""/> <div class="controls-container"> <form ng-submit="add()" class="form-inline"> <div class="form-group"> <input id="Text" ng-model="itemText" type="text" class="form-control" placeholder="Task" /> <input id="PhoneNumber" ng-model="itemPhone" type="tel" class="form-control" placeholder="Phone Number" /> <button class="btn btn-primary">Add Item</button> </div> </form> </div> </div> <script src="lib/jquery/jquery.min.js" type="text/javascript"></script> <script src="lib/angular/angular.min.js" type="text/javascript"></script> <script src="lib/bootstrap/js/bootstrap.min.js" type="text/javascript"></script> <!-- AngularJS App --> <script src="js/app.js" type="text/javascript"></script> <script src="js/controllers/ToDoController.js" type="text/javascript"></script> <script src="js/services/ToDoService.js" type="text/javascript"></script> </body> </html> -
create a new file in the App folder called web.config
<?xml version="1.0" encoding="utf-8"?> <!-- For more information on how to configure your ASP.NET application, please visit http://go.microsoft.com/fwlink/?LinkId=169433 --> <configuration> <system.web> <compilation debug="true" targetFramework="4.5" /> <httpRuntime targetFramework="4.5" /> </system.web> <appSettings> <add key="apiPath" value=""/> </appSettings> <system.webServer> <staticContent> <mimeMap fileExtension="eot" mimeType="application/vnd.ms-fontobject" /> <mimeMap fileExtension="ttf" mimeType="application/octet-stream" /> <mimeMap fileExtension="woff" mimeType="font/x-woff" /> <mimeMap fileExtension="woff2" mimeType="font/x-woff2" /> <mimeMap fileExtension="json" mimeType="application/json"/> </staticContent> </system.webServer> </configuration> - Create three (3) folders in App called css, js, and lib
-
Create a new file in the css folder called site.css and paste the following:
.container { width: 300px; margin: auto; margin-top: 60px; padding: 10px; } ul.check-list { -webkit-padding-start: 0px; } div.check-list-container { width: 300px; min-height: 200px; text-align: right; } li.check-list-item { height: 40px; width: 225px; padding-bottom: 2px; list-style-type: none; text-align: left; } li.check-list-item span.glyphicon { padding: 10px; } div.controls-container { text-align: right; } -
Create a new file in the js folder called app.js
var multiChannelToDoApp = angular.module('multiChannelToDo', []); var apiPath = "http://mobilehol-code.azurewebsites.net/tables"; - Create two (2) folders in the js folder called controllers and services
-
Create a new file in the controllers folder called ToDoController.js
'use strict'; multiChannelToDoApp .controller('ToDoController', ['$scope', 'toDoService', function ($scope, toDoService) { $scope.get = function () { toDoService.getItems() .success(function (data) { $scope.items = data; }); }; $scope.add = function () { toDoService.add($scope.itemText, $scope.itemPhone) .success(function(data){ $scope.itemText = ''; $scope.itemPhone = ''; $scope.get(); }); }; $scope.complete = function (item) { toDoService.complete(item) .success(function (data) { $scope.get(); }); }; $scope.get(); }]); -
Create a new file in the services folder called ToDoService.js
'use strict'; multiChannelToDoApp .factory('toDoService', ['$http', function ($http) { return { getItems: function () { return $http.get(apiPath + '/TodoItem'); }, add: function (task, phoneNumber) { return $http.post(apiPath + '/TodoItem', { "text": task, "phoneNumber": phoneNumber, "complete": false }); }, complete: function (item) { return $http.patch(apiPath + '/TodoItem/' + item.id, { "id": item.id, "text": item.text, "complete": true }); } } }]); - Create three (3) folders in the lib folder called angular, bootstrap, jquery
- Download the minified Angular library from code.angularjs.org
- Download the bootstrap library from getbootstrap.com
- Download the minified jquery library from jquery.com
Publish Angular Web Client
-
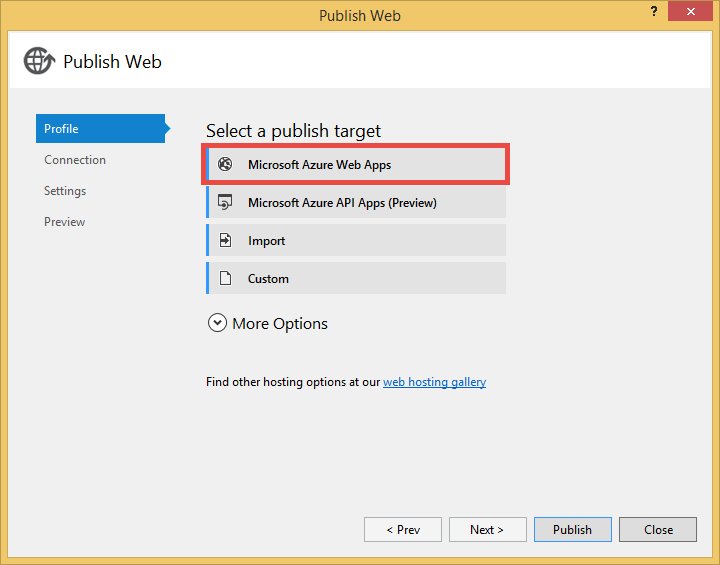
In Solution Explorer, right-click the project and click Publish.

-
In Publish Web, click Microsoft Azure Web Apps.
-
Click Sign in.
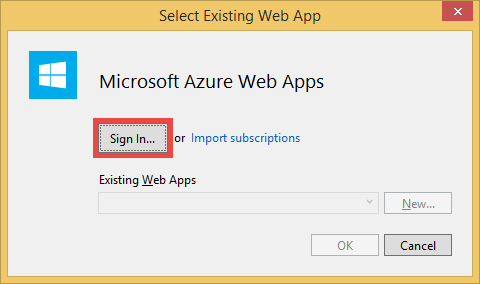
-
Follow the prompts to log into your Azure account.
-
The Select Existing Web App dialog should now show you as signed in. Click New.
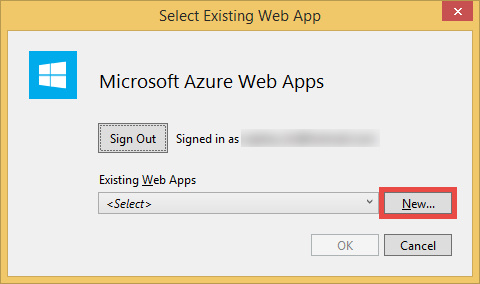
-
In the Web App name field, specify a unique app name prefix. Your fully-qualified web app name will be <prefix>.azurewebsites.net. Also, configure the App Service plan, Resource group, and Region fields. Then, click Create.
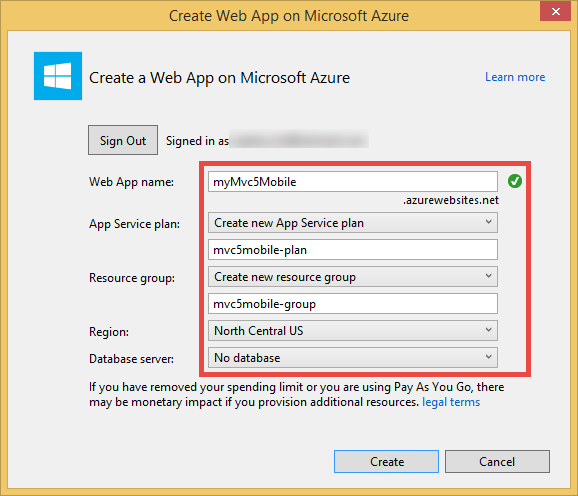
-
The Publish Web dialog will be filled with the settings for your new web app. Click Publish.
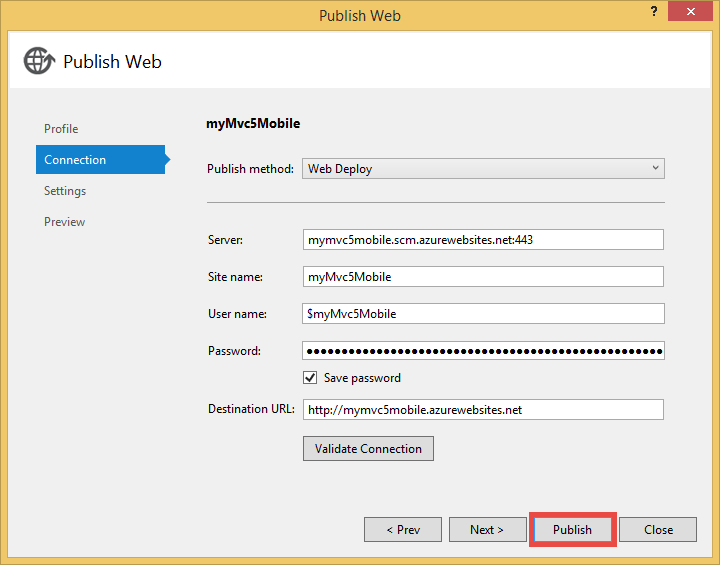
Once Visual Studio finishes publishing the starter project to the Azure web app, the desktop browser opens to display the live web app.
Publishing the application will result in the app folder being deployed to the wwwroot directory. You will be met with a message which says “You do not have permission to view this directory or page.” when the page loads from the browser launched by Visual Studio.
-
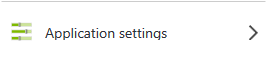
In Web App Blade for the Angular web app, click Settings

-
Click on Application Settings
-
Scroll to the Virtual Applications and Directory section at the bottom of the blade
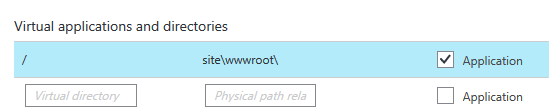
-
Add app to the end of the root virtual application

-
Click Save
Validation Steps
- Browse the Angular Web App or Refresh the browser window opened by Visual Studio.
-
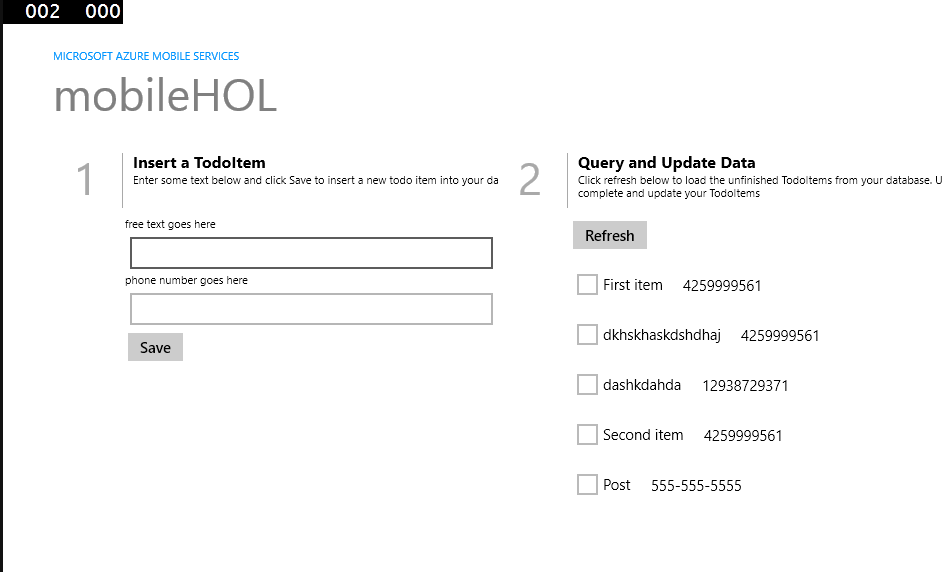
Add a new task by filling in the following UI and hitting Add Item

-
Verify the task is added to the list

-
Click on the task and Verify it is cleared from the list

Create an API App with ASP.NET Web API
Open Visual Studio 2013 and select File > New Project. Select the ASP.NET Web Application Template. name the project appserviceholapi, and then click OK.
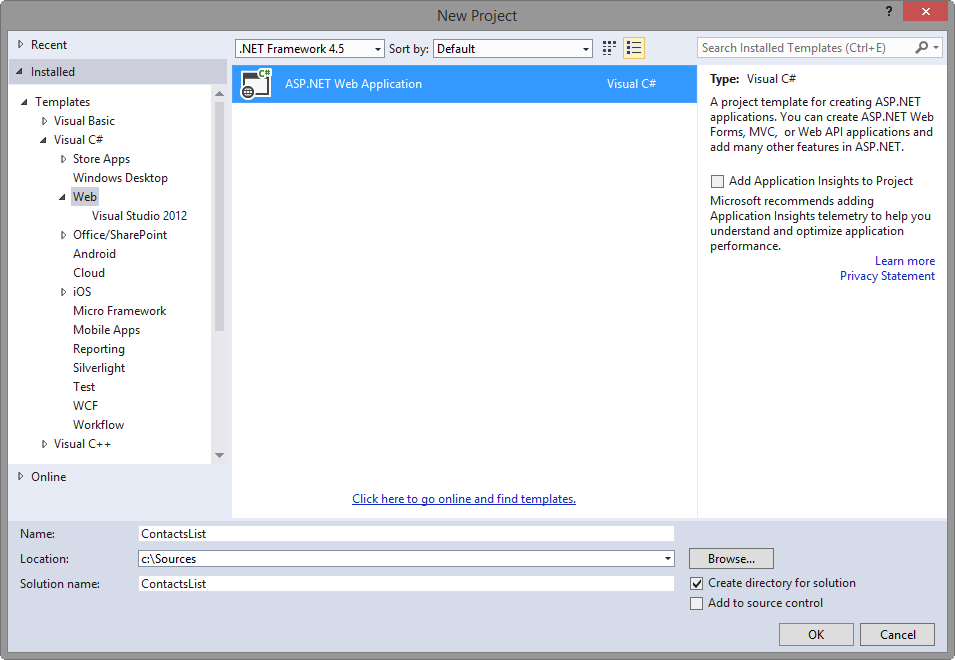
In the New ASP.NET Project dialog, select the Empty project template.
Click the Web API check box.
Clear the Host in the cloud check box.
Click OK.
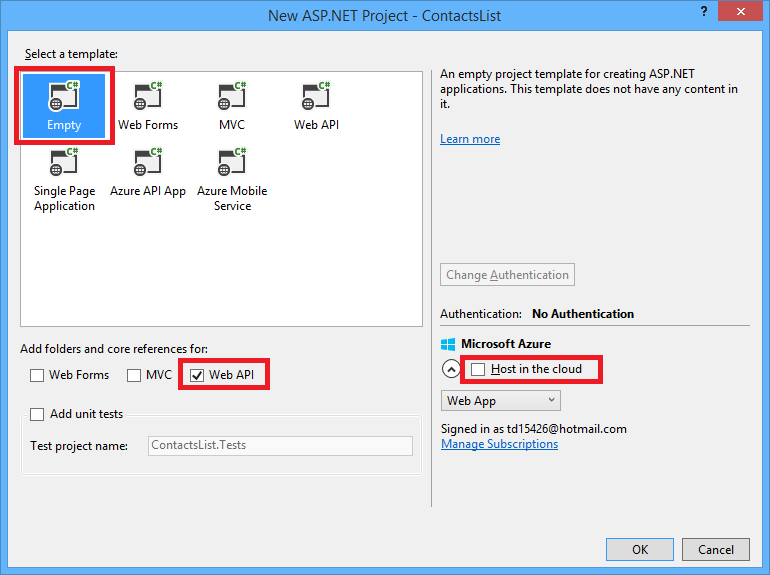
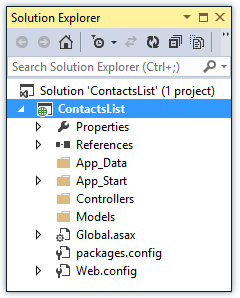
Visual Studio creates project files for an empty Web API project.
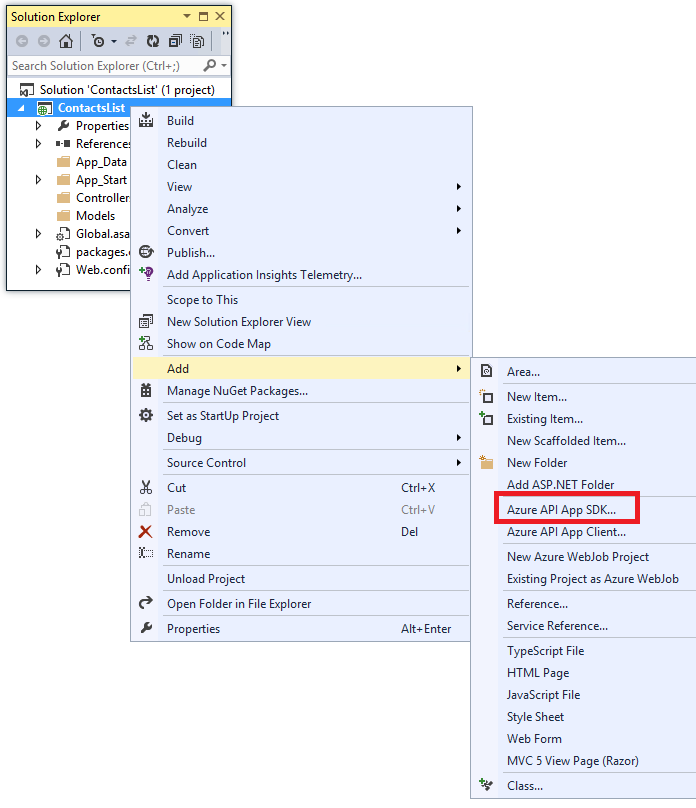
In Solution Explorer, right-click the project (not the solution), and then click Add > Azure API App SDK.
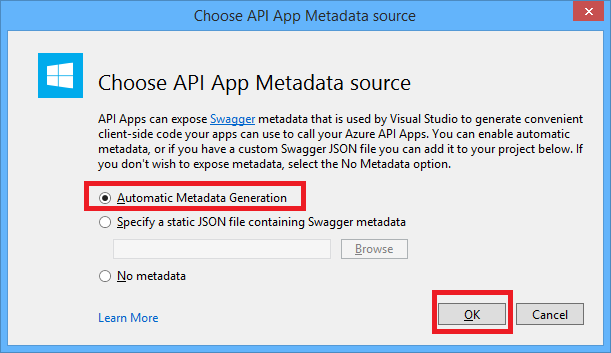
In the Choose API App Metadata source dialog, click Automatic Metadata Generation, and then click OK.
This choice enables the dynamic Swagger UI, which you’ll see later in the tutorial. For information about the static Swagger metadata file option, see Convert an existing API to an API app.
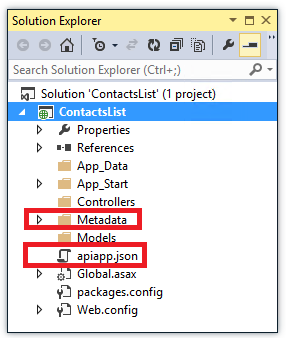
When you click OK, Visual Studio installs API app NuGet packages and adds API app metadata to the Web API project. In the next section you see what was added.
Review API app metadata
The metadata that enables a Web API project to be deployed as an API app is contained in an apiapp.json file and a Metadata folder.
The default contents of the apiapp.json file resemble the following example:
	{
	    "$schema": "http://json-schema.org/schemas/2014-11-01/apiapp.json#",
	    "id": "appserviceholapi",
	    "namespace": "microsoft.com",
	    "gateway": "2015-01-14",
	    "version": "1.0.0",
	    "title": "appserviceholapi",
	    "summary": "",
	    "author": "",
	    "endpoints": {
	        "apiDefinition": "/swagger/docs/v1",
	        "status": null
	    }
	}
The Metadata folder contains information such as screenshots for the API App gallery or a static Swagger API definition file.
For this tutorial you don’t need to modify any of this metadata. For more information about the format of apiapp.json and the contents of the Metadata folder, see Convert an existing API to an API app.
Add Web API code
In the following steps you add code for a simple HTTP Get method that returns a hard-coded list of contacts.
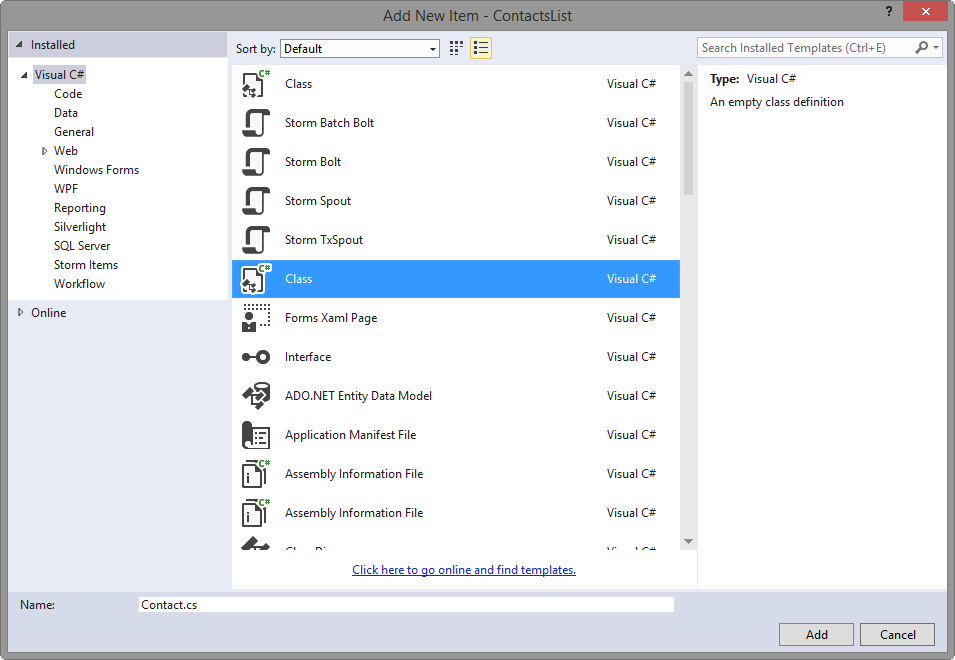
Right-click the Models folder in the Web API project, and then in the context menu select Add > Class.
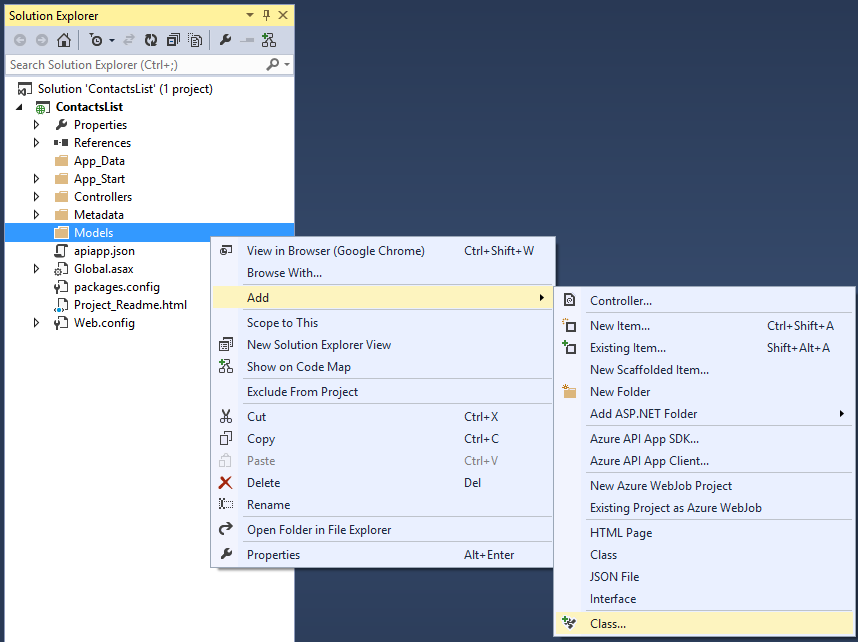
Name the new file todoitem.cs, and then click Add.
Replace the entire contents of the file with the following code.
namespace appserviceholapi.Models
{
    public class TodoItem
    {
        public string Id { get; set; }
        public string Text { get; set; }
        public bool Complete { get; set; }
        public string PhoneNumber { get; set; }
        public bool Processed { get; set; }
    }
}
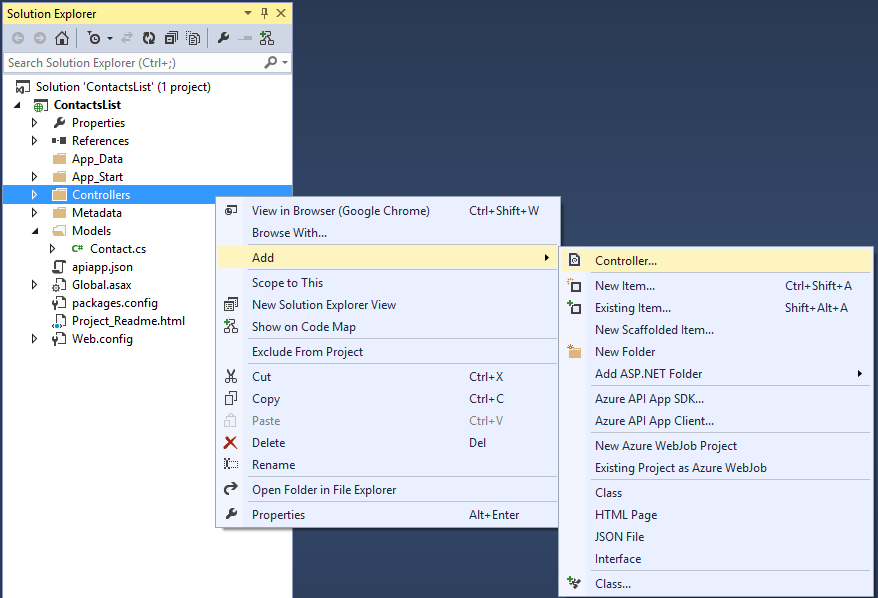
Right-click the Controllers folder, and then in the context menu select Add > Controller.
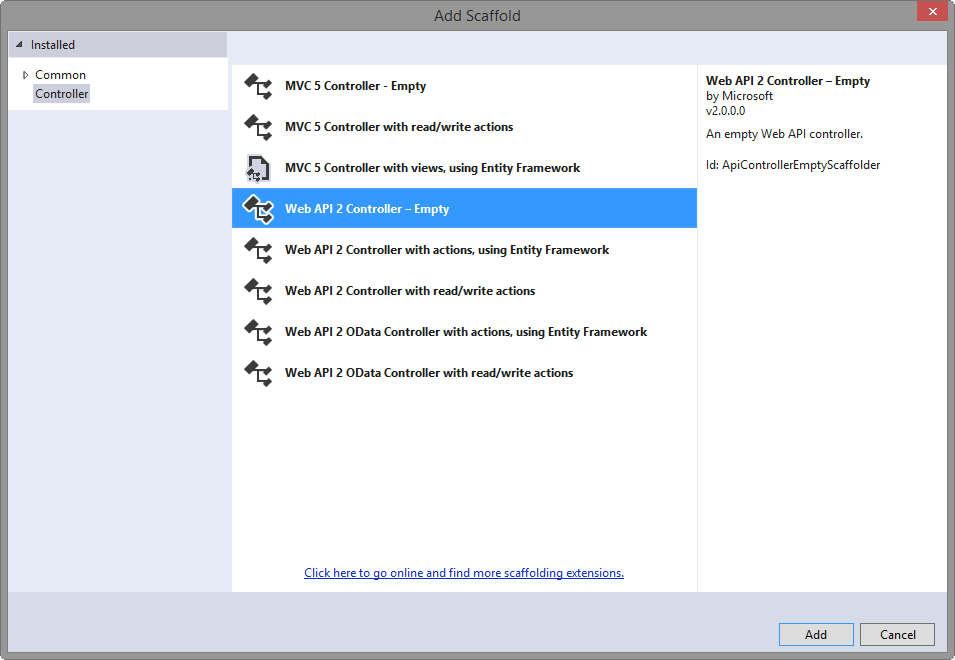
In the Add Scaffold dialog, select the Web API 2 Controller - Empty option and click Add.
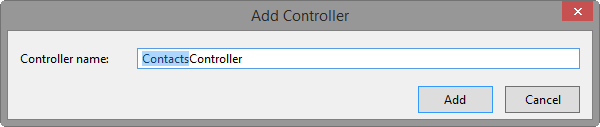
Name the controller ValuesController and click Add.
Replace the code in this file with the code below.
using appserviceholapi.Models;
using System;
using System.Collections.Generic;
using System.Configuration;
using System.Data;
using System.Data.Common;
using System.Data.SqlClient;
using System.Web.Http;

namespace appserviceholapi.Controllers
{
    public class ValuesController : ApiController
    {
        protected readonly string _connectionString;

        public ValuesController()
        {
            _connectionString = ConfigurationManager.ConnectionStrings["DefaultConnection"].ConnectionString;
        }

        [HttpGet]
        // GET api/values/
        public IEnumerable<TodoItem> GetUnProcessedItems()
        {
            List<TodoItem> values;

            using (SqlConnection conn = new SqlConnection(_connectionString))
            {
                using (SqlCommand selectCommand = new SqlCommand("SELECT [Id] ,[Text],[Complete],[PhoneNumber],[Processed] FROM [mobileHOL].[TodoItems] WHERE [Processed]=0 AND Complete=1", conn))
                {
                    conn.Open();
                    values = new List<TodoItem>();
                    foreach (DbDataRecord item in selectCommand.ExecuteReader())
                    {
                        values.Add(
                            new TodoItem
                            {
                                Id = item["Id"].ToString(),
                                Text = item["Text"].ToString(),
                                PhoneNumber = item["PhoneNumber"].ToString(),
                                Complete = Convert.ToBoolean(item["Complete"]),
                                Processed = Convert.ToBoolean(item["Processed"])
                            }
                        );
                    }
                }
            }

            return values;
        }

        [HttpPatch]
        // PATCH api/values/{id}
        public void PatchUnProcessedItem(string id)
        {
            using(SqlConnection conn = new SqlConnection(_connectionString))
            {
                using (SqlCommand updateCommand = new SqlCommand("UPDATE [mobileHOL].[TodoItems] SET [Processed]=1 WHERE [Id]=@id", conn))
                {
                    conn.Open();

                    // Assign user provided value to @id
                    updateCommand.Parameters.Add("@id", SqlDbType.NVarChar, 128);
                    updateCommand.Parameters["@id"].Value = id;

                    updateCommand.ExecuteNonQuery();
                }
            }
        }
    }
}
Enable Swagger UI
By default, API App projects are enabled with automatic Swagger metadata generation, and if you used the Add API App SDK menu entry to convert a Web API project, an API test page is also enabled by default.
However, the Azure API App new-project template disables the API test page. If you created your API app project by using the API App project template, you need to do the following steps to enable the test page.
Open the App_Start/SwaggerConfig.cs file, and search for EnableSwaggerUI:
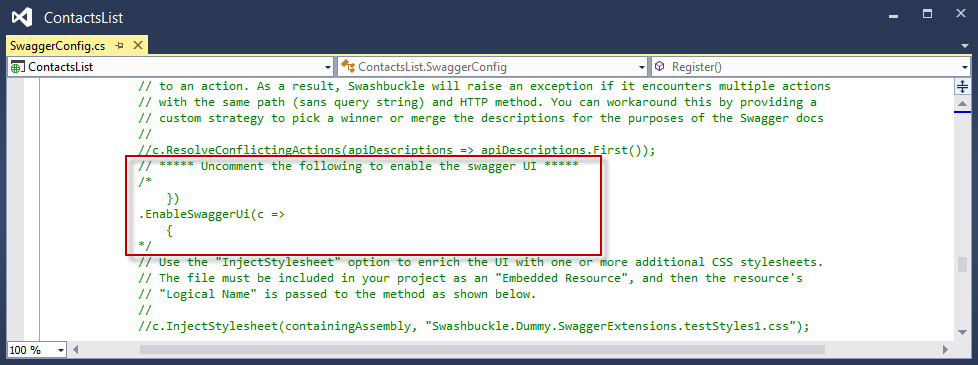
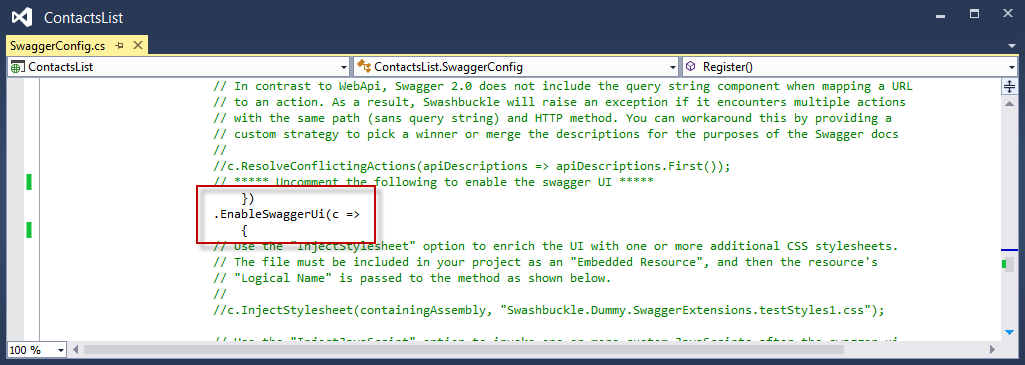
Uncomment the following lines of code:
    })
.EnableSwaggerUi(c =>
    {
When you’re done, the file should look like this:
Test the Web API
To view the API test page, run the app locally (CTRL-F5) and navigate to /swagger.
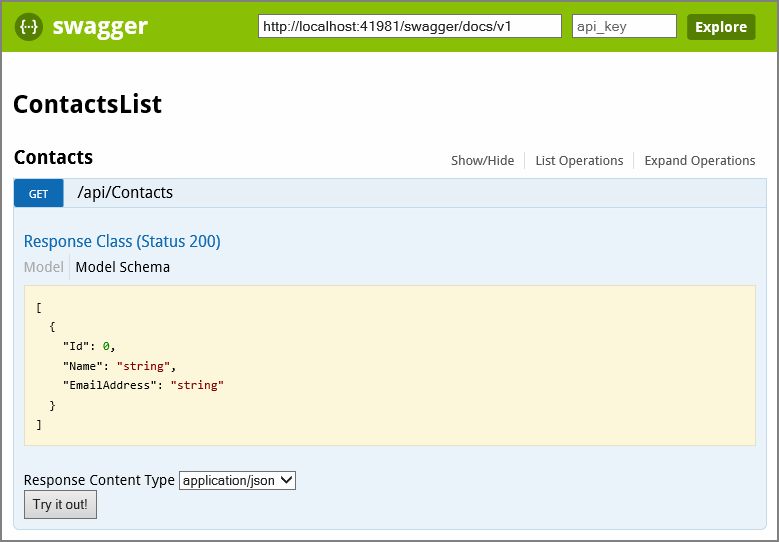
Click the Try it out button, and you see that the API is functioning and returns the expected result.

Create a Logic App
Now, you need to create a new Logic app:
-
Click on the + New button at the bottom-left of the screen, expand Web + Mobile, then click Logic App.
This displays the Create logic app blade, where you provide some basic settings to get started.

-
In Name type a meaningful name for your logic app.
-
Choose the App service plan you used when creating your API App. This should automatically choose the Location, Subscription and Resource Group for you. This takes care of the basic settings, click Create to provision your empty logic application.
Adding a trigger
In the Logic app you will first add a trigger to your workflow.
-
On the Logic App blade, click the Triggers and actions part to open the editing canvas
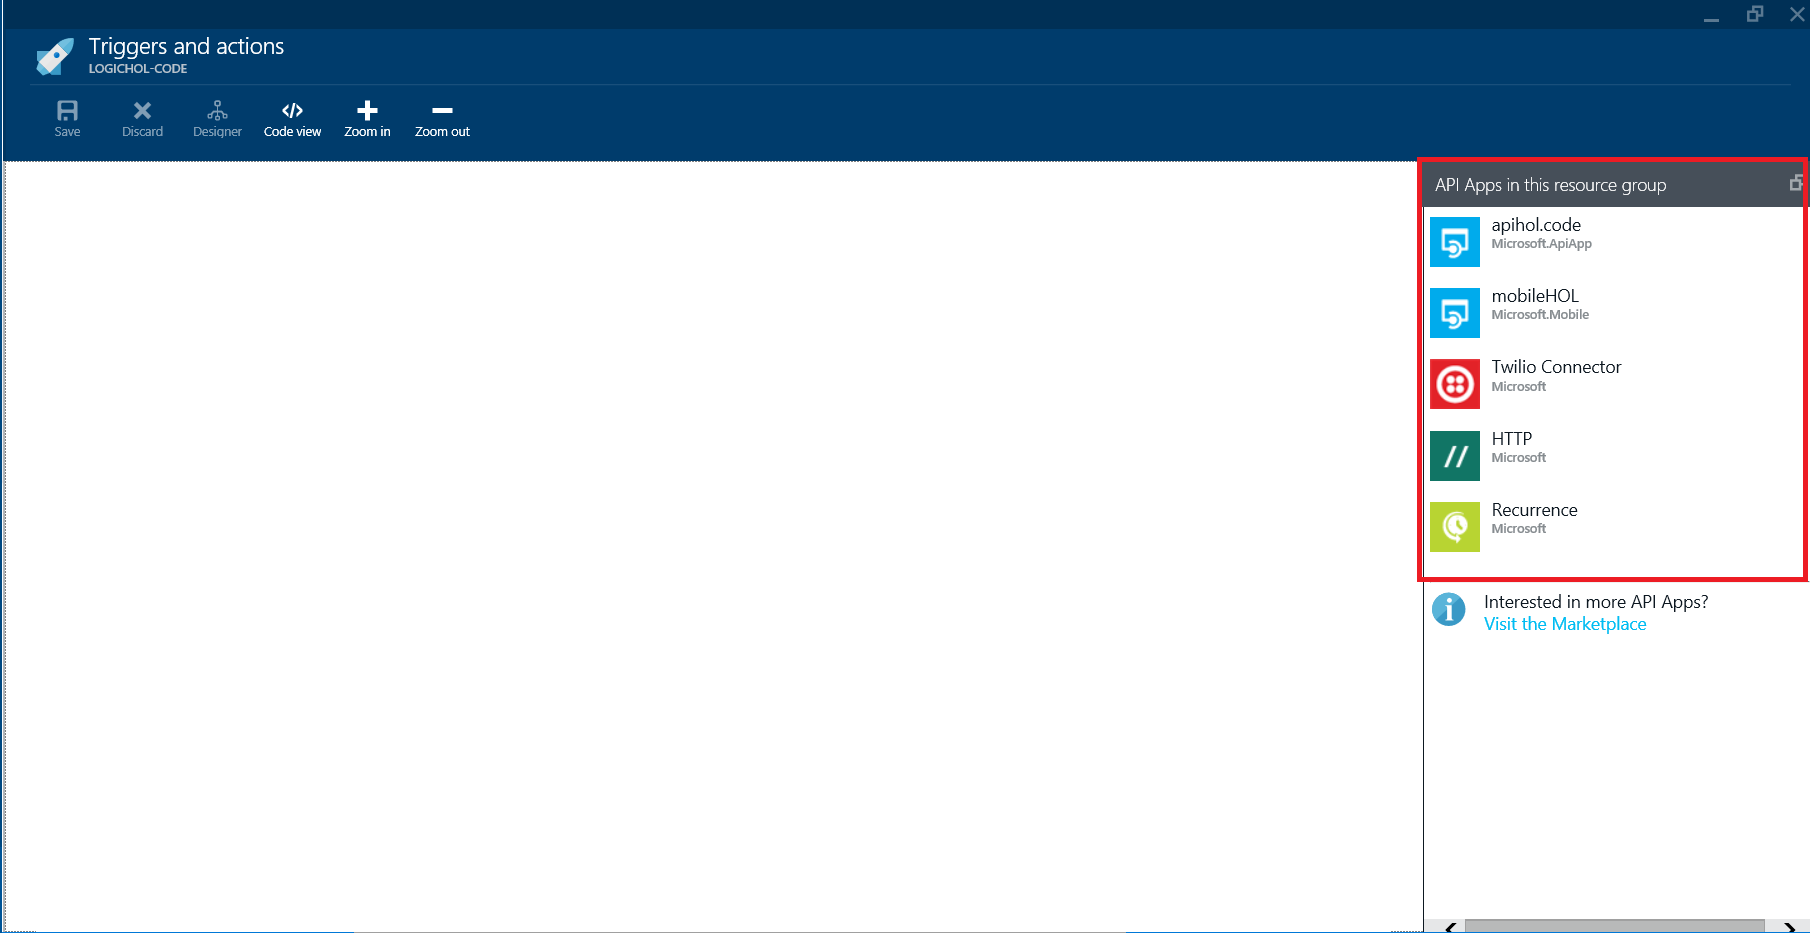
On the right side of the editor, you will find the API Apps in this resource group, which by now should include your API App that you created in previous steps, Mobile API that was auto generated for you (we will ignore it for now), and two default (code-less) API Apps provided by Microsoft HTTP and Recurrence.
-
Click on the Recurrence API to add a trigger to your application.
-
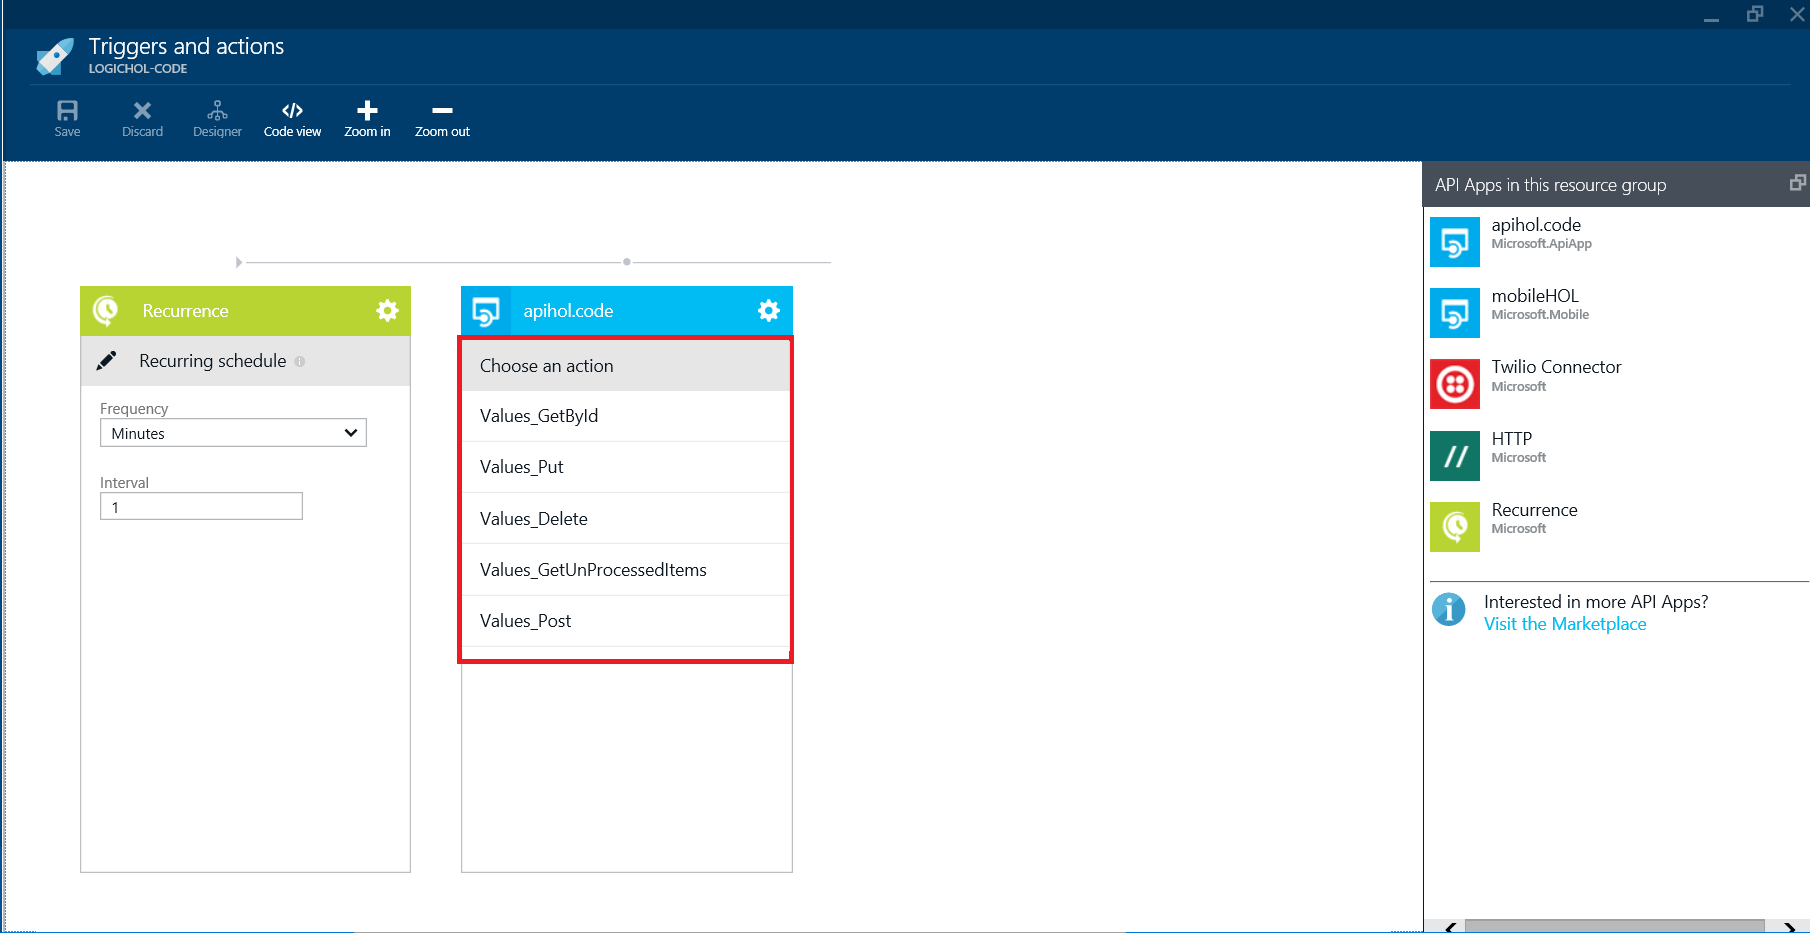
Click the pen icon to edit the Recurrence setting. Set the Frequency to Minutes and the Interval to 1. This will trigger the workflow to start every minute. Note : your plan must be Standard or above to run the logic every minute.

Add the actions
Next we will add the actual actions themselves (the outgoing calls).
-
Click on the API App you created in the right pane and choose the values_GetUnprocessedItems action, which is the API that returns all completed items that have not been processed yet.
-
Next, add an HTTP API connector from the right pane. Choose PATCH as the action.
-
In the
...menu at the top of the card select Repeat over a list. In the Repeat box selectapihol.code body.In case there are multiple items returned from the API App, this line will force the HTTP API connector to iterate over all items that are returned from from your Web API connector call.
-
In the URI box, type your mobile code backend URL and add the following suffix
/tables/TodoItem/@{repeatItem().id}As an example, for the URI looks like this-http://mobilehol-code.azurewebsites.net/tables/TodoItem/@{repeatItem().id} -
In the Body box type
{"processed":true}(this marks the processed flag as true).In REST APIs, the PATCH verb can take partial parts of the full body object. This will end up calling the mobile backend code updating the item identified by
repeatItem().id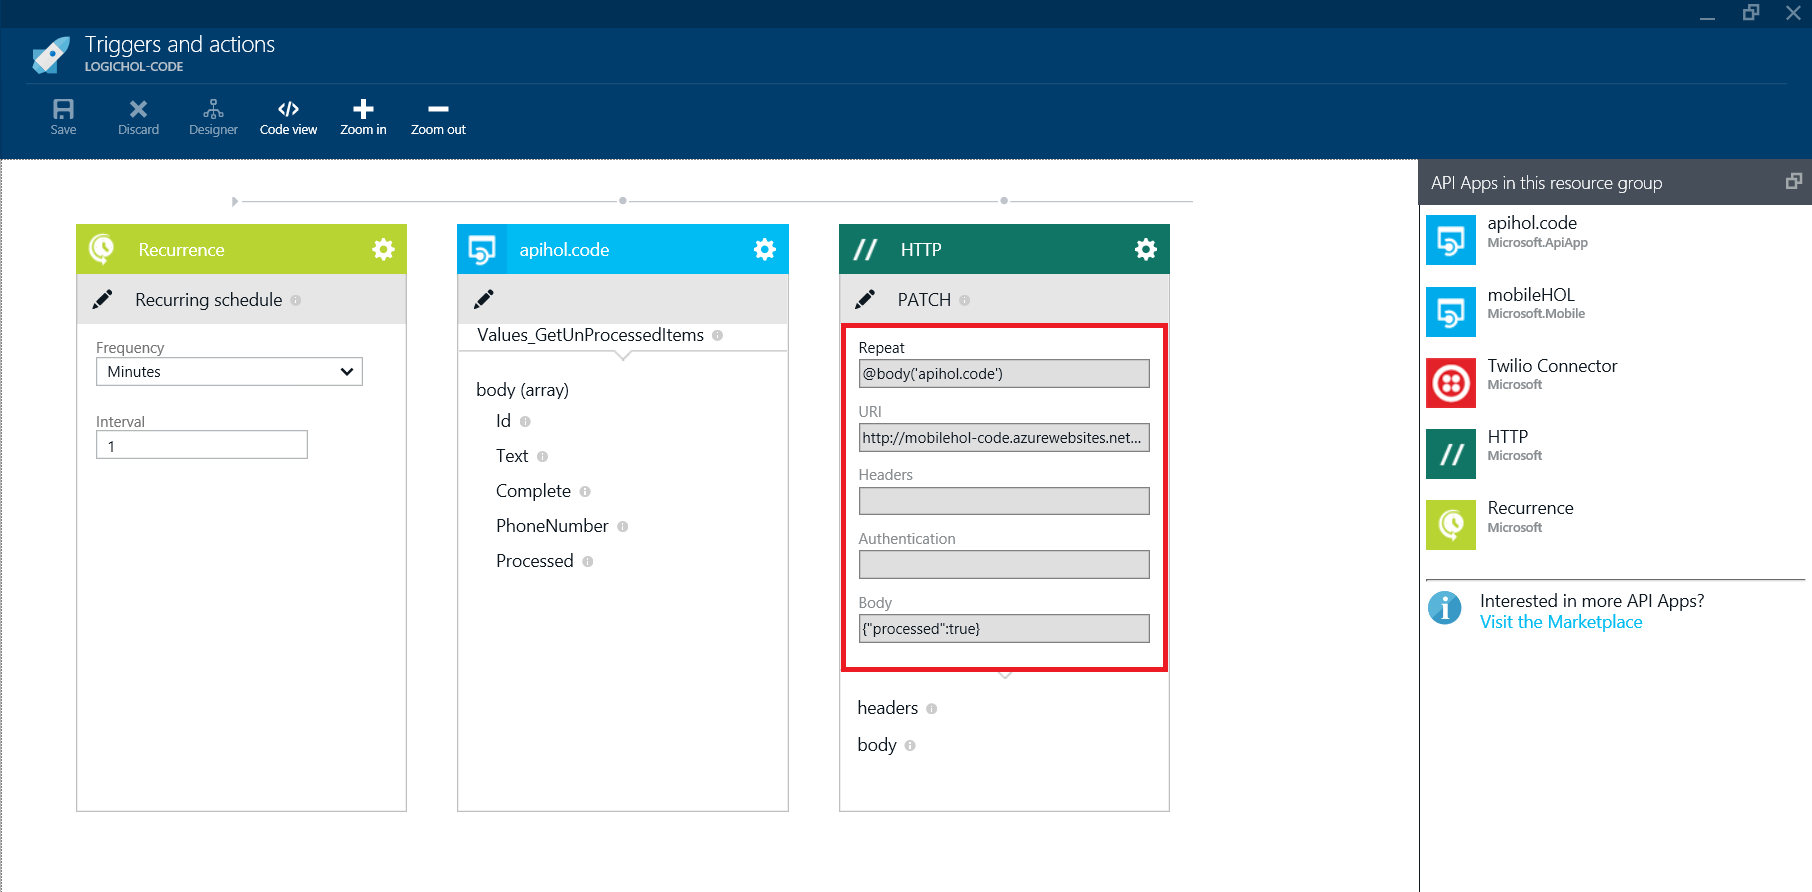
-
Save the flow you created.
Viewing the history of your Logic app
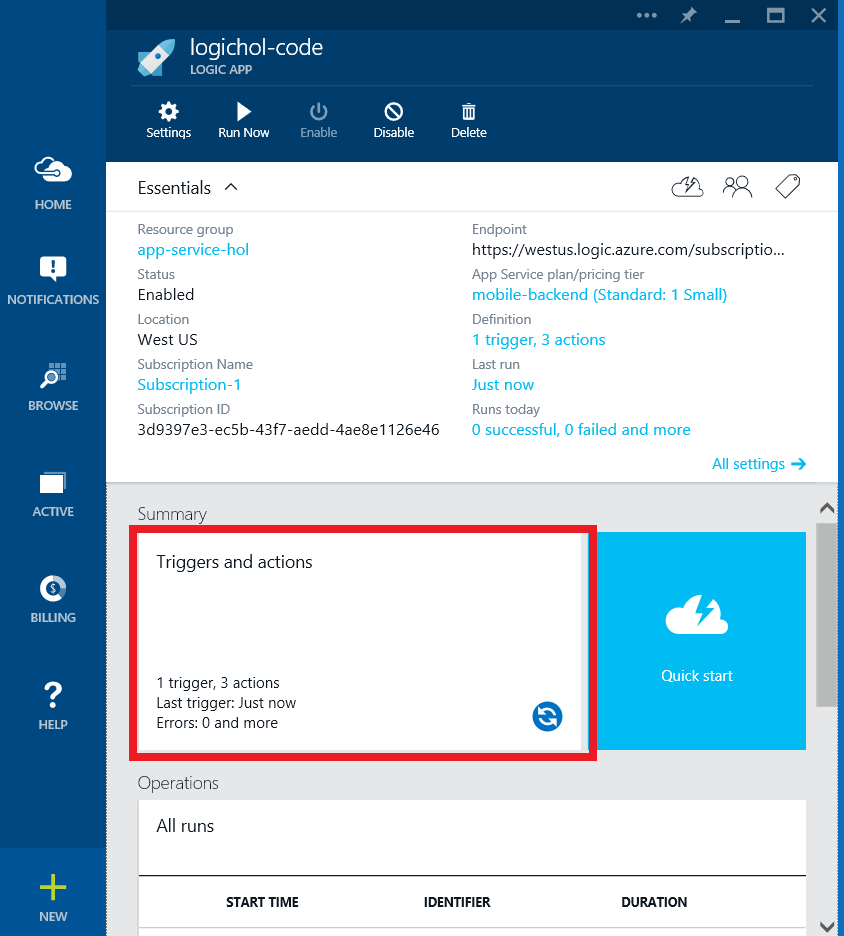
Return to the Logic App Blade. At this point your Logic App is ready to run and will start running automatically. At the bottom of the Logic App blade, you can see the state of the All runs.
A green check mark indicates successful run. Click on specific run instance shows all the steps of the workflow:
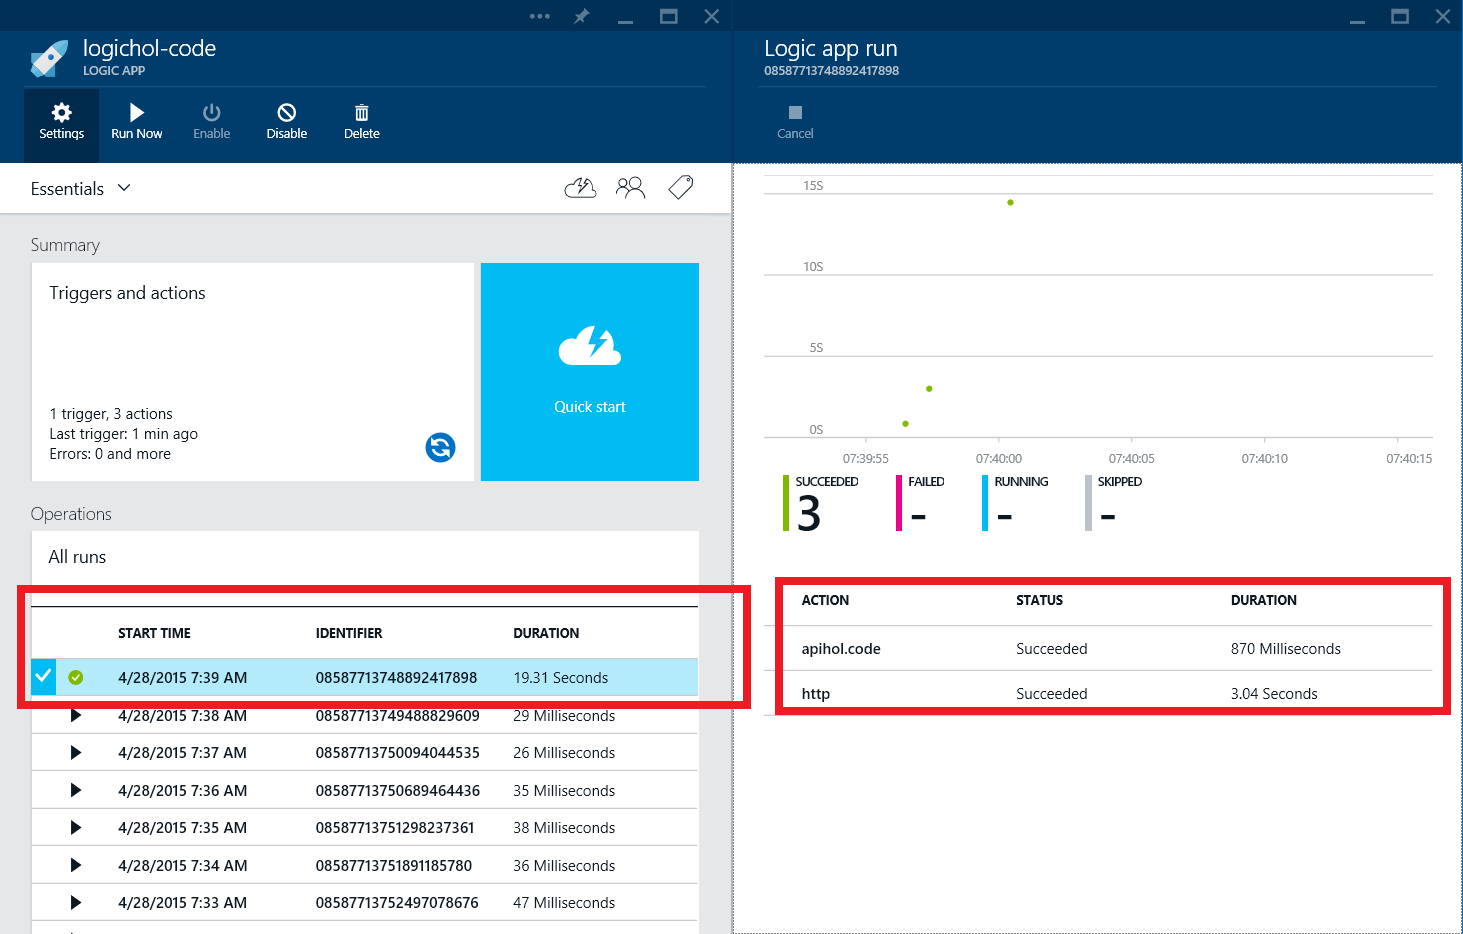
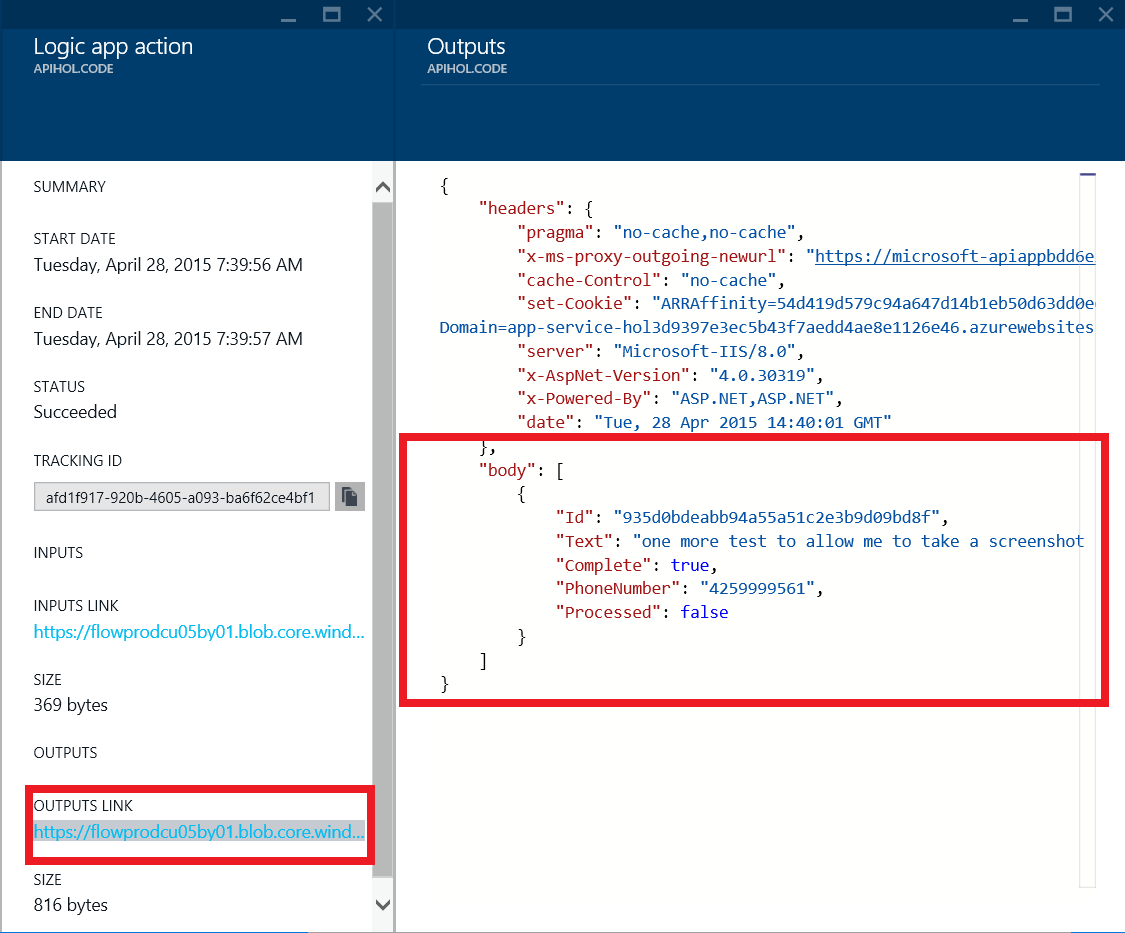
Click on the API App action to view a summary of the step. Click on the OUTPUT LINK to view the output returned from the API App call.
Note: if you are not seeing any action on your Logic App. Try creating a new to do item in your mobile or web applications. Then mark that item as complete. This will trigger the workflow.